Use Cases
Docs
Blog Articles
BlogResources
Pricing
PricingHow to control Raspberry Pi from the Cloud

Co-founder & CEO, InfinyOn

Raspberry Pi is a versatile low-cost computer ideal for prototyping IoT projects such as air quality monitors, water level sensors, autonomous irrigation systems, surveillance cameras, face recognition robots, home automation, and many more. The Raspberry Pi is easy to connect to your home network but quite challenging to connect and control from the Cloud.
This tutorial will show how to connect Raspberry Pi to InfinyOn Cloud - a high-performance, distributed, programmable streaming platform. Once connected, you can use InfinyOn Cloud or a Fluvio client anywhere in the world to communicate with your device. In addition, this blog will show the ability to control a mini traffic light in real-time.
All message exchanges between your Raspberry Pi and the Cloud are encrypted to ensure privacy and security.
Prerequisites
This blog assumes you have an InfinyOn Cloud account and access to a Raspberry Pi device and a Pi traffic light. As a substitute for the traffic light, you could wire up an LED on the breadboard.
- InfinyOn Cloud Account - create a free account here.
- Raspberry Pi - this tutorial uses Model B+ (other models not tested but expected to work).
- The device must run Ubuntu 20.04 TLS (32 bit) OS or above.
- Pi Traffic Light - available for purchase here.
Check Raspberry Pi
The Raspberry Pi should be running Ubuntu, python3 and pip3. To check run the following commands:
$ uname -a
Linux ubuntu 5.8.0-1011-raspi #14-Ubuntu SMP PREEMPT Tue Dec 15 08:58:13 UTC 2020 armv7l armv7l armv7l GNU/Linux

$ python3 -V
Python 3.8.10

$ pip3 -V
pip 21.2.4 from /home/ubuntu/.local/lib/python3.8/site-packages/pip (python 3.8)
We are using python to control the GPIO pins that turns the lights on and off.
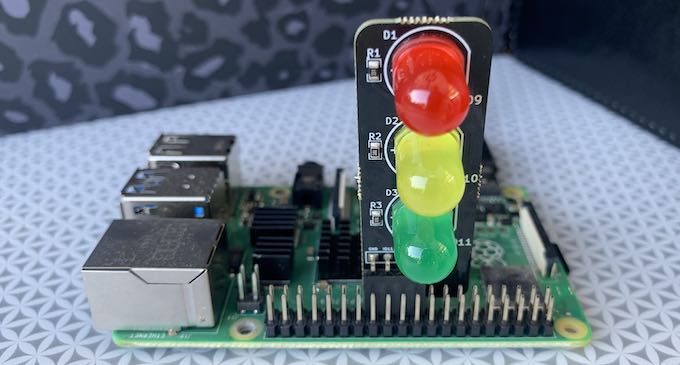
Connect the Traffic Lights
Now it’s time to work on the hardware. First, we’ll connect the traffic lights to the Raspberry Pi and ensure they are in working order.
The nice thing about the traffic lights component is that we can directly insert it into the Raspberry Pi pins.
Just make sure the lights face outwards.
Test the Lights
As the traffic lights are controlled through GPIO pins, we need to install a package called gpiozero:
$ sudo apt install python3-gpiozero
It’s time to write some code. Create a file called lights.py and paste the following code:
from gpiozero import LED
from time import sleep
class Lights:
def __init__(self):
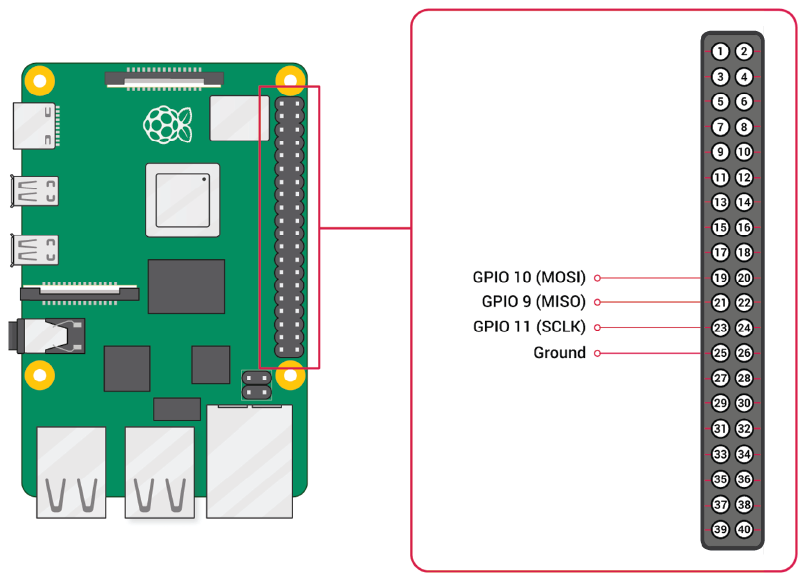
self.red = LED(9)
self.yellow = LED(10)
self.green = LED(11)
def go(self):
self.off()
self.green.on()
def stop(self):
self.off()
self.yellow.on()
sleep(1)
self.yellow.off()
self.red.on()
def on(self):
self.red.on()
self.yellow.on()
self.green.on()
def off(self):
self.red.off()
self.yellow.off()
self.green.off()
def main():
lights = Lights()
lights.go()
sleep(1)
lights.stop()
sleep(1)
for x in range(5):
sleep(.5)
lights.on()
sleep(.5)
lights.off()
if __name__ == "__main__":
main()
The code has several routines to control the GPIO pins corresponding to red, yellow, and green— each routine is followed by a sleep statement that keeps the lights on for a short time.
To execute the code, run:
$ python3 lights.py
Let’s see it in action:
Very cool, the lights are working corretly.
Installing Fluvio Client
You’ll need to download and install the CLI.
$ curl -fsS https://hub.infinyon.cloud/install/install.sh | bash
This command will download the Fluvio Version Manager (fvm), Fluvio CLI (fluvio) and config files into $HOME/.fluvio, with the executables in $HOME/.fluvio/bin. To complete the installation, you will need to add the executables to your shell $PATH.
Check the version to make sure everything is working correctly:
$ fluvio version
As expected, the client is not yet associated with a cluster. We’ll do that next.
Setup InfinyOn Cloud
InfinyOn Cloud is the intermediation point between your Raspberry Pi and any other devices (cloud or local). Let’s create an account and login with Fluvio client.
Create a free InfinyOn Cloud
Signup at https://infinyon.cloud/signup.
Login with Fluvio Client
In Raspberry Pi, at the terminal, type the following command:
$ fluvio cloud login
Infinyon Cloud email: ...
Password: ...
Fluvio Client establishes a connection with InfinyOn Cloud and downloads your profile. The profile has your TLS settings to ensure message exchanges are encrypted.
Let’s make sure the client can communicate with the cluster in the cloud. Add a topic called lights:
$ fluvio topic create lights
topic "lights" created
Congratulations, your Raspberry Pi is now connected to the cloud.
Install fluvio-python-client
We want to control our light programmatically from our Python code. To accomplish this, we need to install the python native fluvio client.
On Raspberry Pi 2/3, download linux_armv7l:
$ pip3 install https://github.com/infinyon/fluvio-client-python/releases/download/v0.9.5/fluvio-0.9.5-cp38-cp38-linux_armv7l.whl
For Pi Zero, download linux_armv6l:
$ pip3 install https://github.com/infinyon/fluvio-client-python/releases/download/v0.9.5/fluvio-0.9.5-cp38-cp38-linux_armv6l.whl
Update lights.py file
Next, we’ll update the python file from to listen to events from fluvio:
from gpiozero import LED
from time import sleep
from fluvio import (Fluvio, Offset)

class Lights:
    def __init__(self):
        self.red = LED(9)
        self.yellow = LED(10)
        self.green = LED(11)

    def go(self):
        self.off()
        self.green.on()

    def stop(self):
        self.off()
        self.yellow.on()
        sleep(1)
        self.yellow.off()
        self.red.on()

    def on(self):
        self.red.on()
        self.yellow.on()
        self.green.on()

    def off(self):
        self.red.off()
        self.yellow.off()
        self.green.off()


def main():
    lights = Lights()

    fluvio = Fluvio.connect()
    print("connected to fluvio")

    consumer = fluvio.partition_consumer("lights", 0)
    print("retrieved consumer")

    for i in consumer.stream(Offset.end()):
        value = i.value_string()
        print("received: %s" % value)

        if value == "go":
            lights.go()
        elif value == "stop":
            lights.stop()
        elif value == "on":
            lights.on()
        elif value == "off":
            lights.off()

if __name__ == "__main__":
    main()
The code changes are as follows:
- import Fluvio and Offset from the fluvio python client.
- extablish a connection to InfinyOn Cloud.
- open a consumer stream that listens on lights topic on partition 0.
- for every known command go, stop, on, off, call the light routine.
Let’s restart the program.
Run the new code:
$ python3 lights.py
connected to fluvio
retrieved consumer
Control Raspberry Pi from InfinyOn Cloud
Open the web browser at https://infinyon.cloud, and navigate to lights topic. In the record field, type go, stop and watch the lights change:
Congratulations, your Raspberry Pi is connected to the Cloud!
Control Raspberry Pi from Fluvio CLI
You can also use fluvio cli to remotely contol the device.
In the terminal type:
$ fluvio produce lights
> go
Ok!
> stop
Ok!
> on
Ok!
> off
Ok!
>
Fluvio supports any number of producers and consumers, which enables your Raspberry to be control with multiple producers at the same time.
Conclusion
The blog is an introductory tutorial on how to connect and manage Raspberry Pi from the Cloud. Fluvio and InfinyOn Cloud has many more feature that can help you manage multiple topics and edge devices in parallel. Future blogs will describe how to use SmartModules to perform analytics and control independent devices in a large deployment.
That’s it for this post, be sure to join or community on Discord if you want to talk to us or have any questions. Until next time!