Use Cases
Docs
Blog Articles
BlogResources
Pricing
PricingTransform your data into real-time intelligence.
InfinyOn is a next-generation streaming platform that unifies your data flows, accelerates processing with Rust and WebAssembly, and empowers developers to build responsive, intelligent applications at any scale. Turn streaming data into your competitive advantage.

Make your streaming analytics simpler than batch
-

Simplify
InfrastructureRun your entire streaming operation with a single reliable system. No more complex bloated infra.
-

Speed Up
DevelopmentBuild and deploy new pipelines in minutes. Iterate faster with developer-centric tooling.
-

Scale with
ConfidenceHandle growing data volumes without growing complexity. Scale your system without needing babysitters.
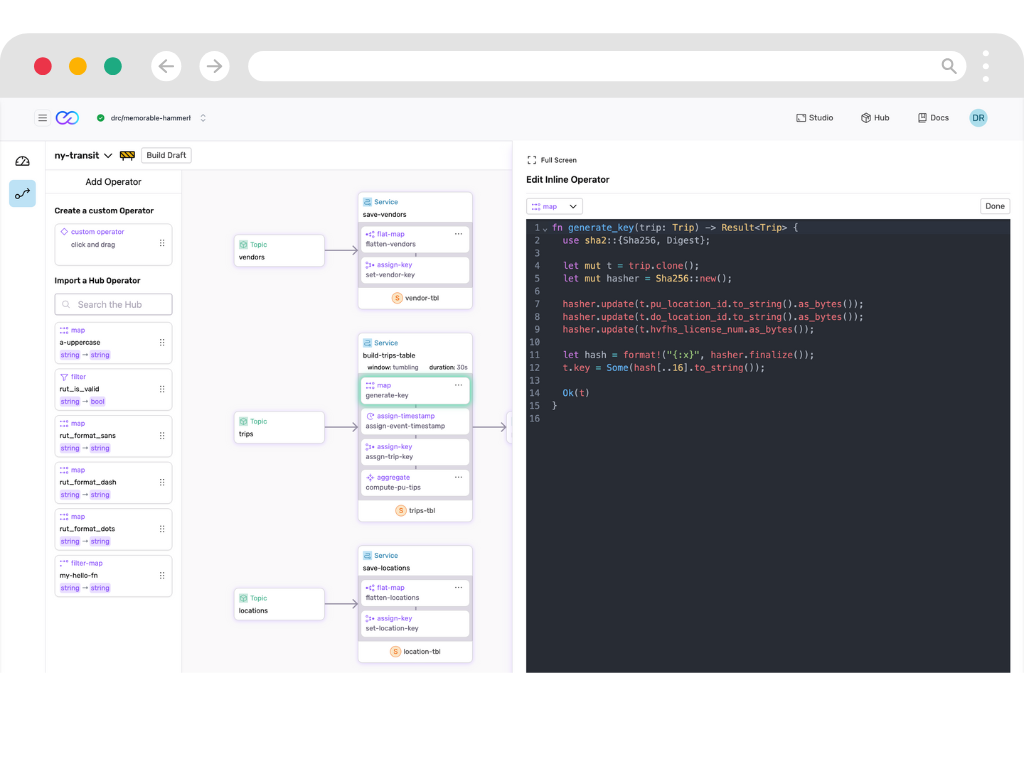
Compose Data Pipelines
Build production-ready data pipelines in minutes instead of months.
- Developer-First Framework
- Create data flows as easily as writing GitHub Actions. Build once, reuse anywhere.
- Stateful Processing
- Handle complex state management with zero boilerplate code. Focus on business logic, not infrastructure.
- Rapid Development
- Deploy changes in seconds with our WebAssembly modules. Test locally, run globally.
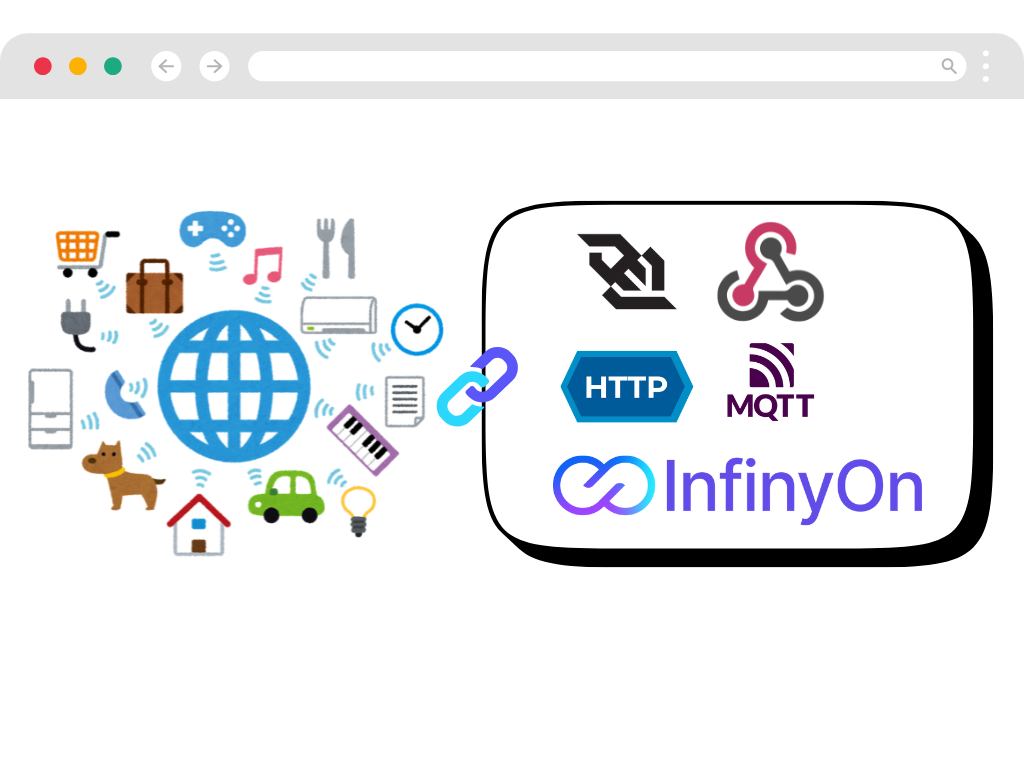
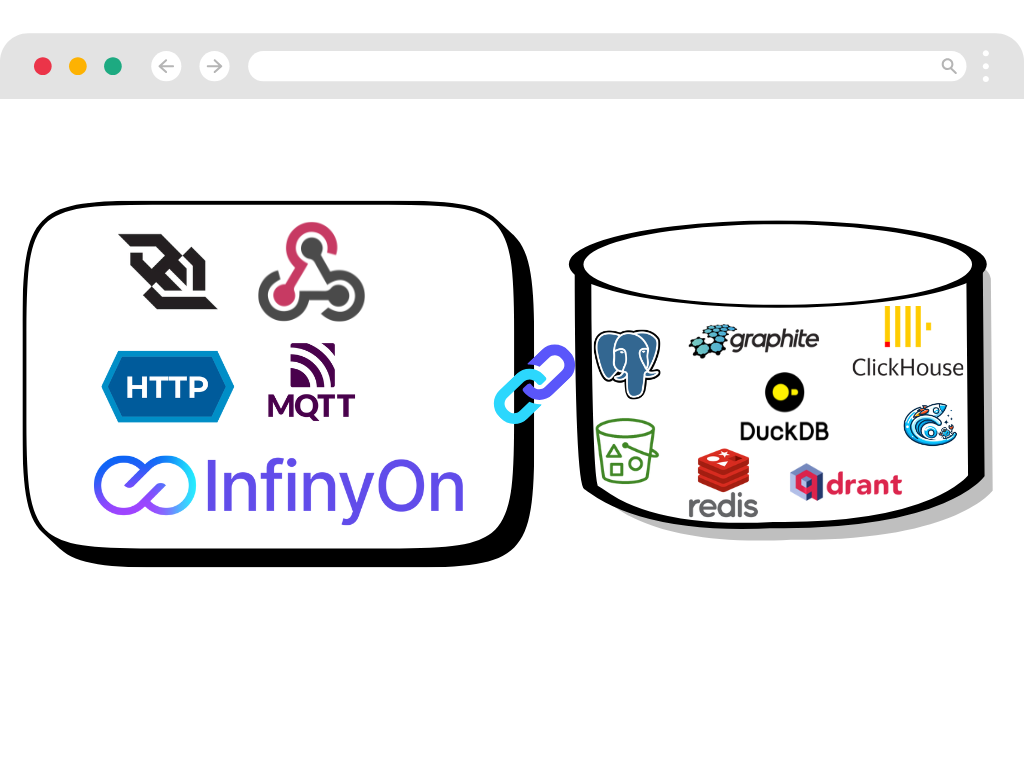
Capture and Ingest Events
Connect any data source with minimal integration code.
- Universal Connectivity
- Use Fluvio Client, built in connectors or build custom connectors using our Connector Development Kit (CDK). Connect to any system with the same unified API.
- Edge to Cloud
- Deploy our 37MB binary anywhere. Process data where it's created, sync when ready.
- Zero Data Loss
- Built-in caching and offline mirroring ensure your data arrives, even with unreliable networks.
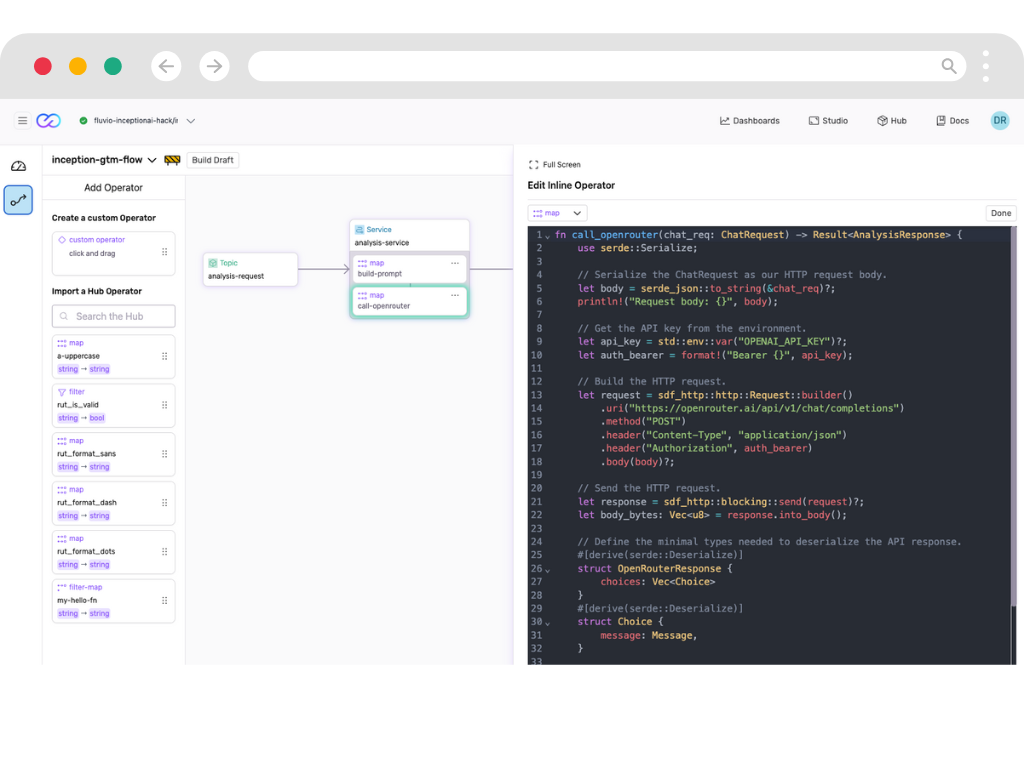
Transform and Enrich with AI
Apply real-time transformations with 50x better memory efficiency than traditional solutions.
- Flexible Transformations
- Deploy secure, high-performance data transformations anywhere, call out to APIs including AI/ML models and LLMs
- Familiar Primitives
- Build complex stream processing logic with our Stateful DataFlow framework with familiar primitives for reliable data transformations.
- Reusable Transforms
- Access pre-built transformation modules from our SmartModule Hub to accelerate development.
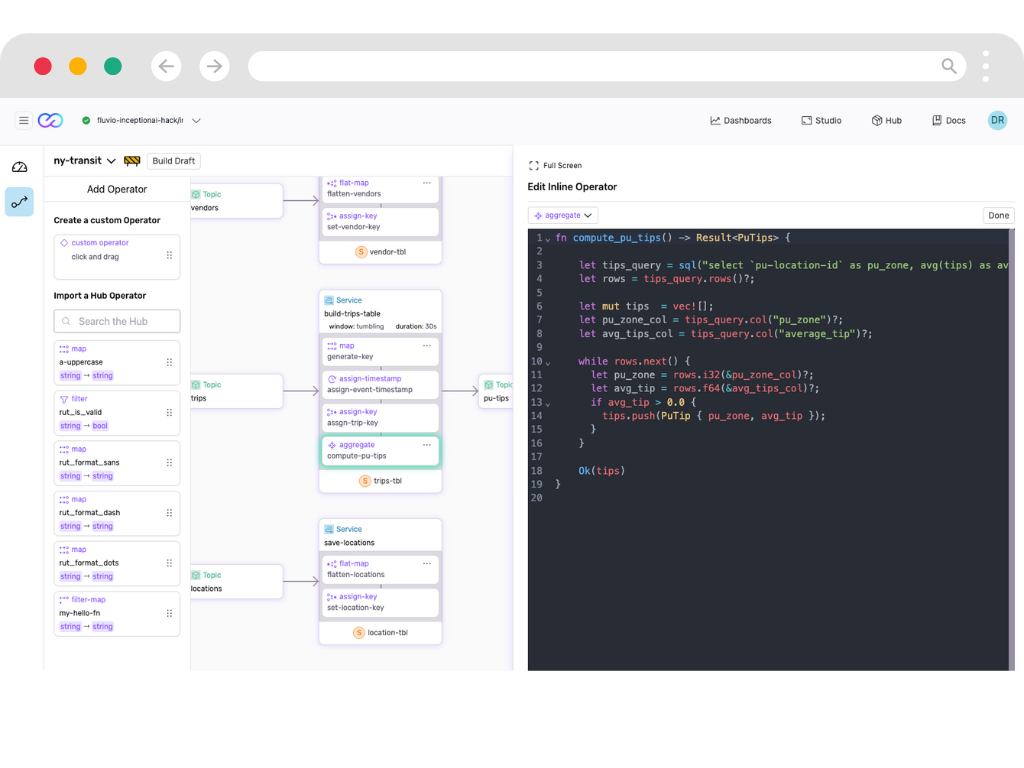
Compute Analytics On-Demand
Process continuous data streams with immediate results.
- Window Processing
- Create time and event-based windows to analyze streaming data as it arrives. No more waiting for batch jobs.
- Streaming SQL
- Query live data streams using familiar SQL. Turn complex event processing into simple queries.
- Efficient Computation
- Run analytics workloads with 50x less memory than traditional solutions. Scale without infrastructure bloat.
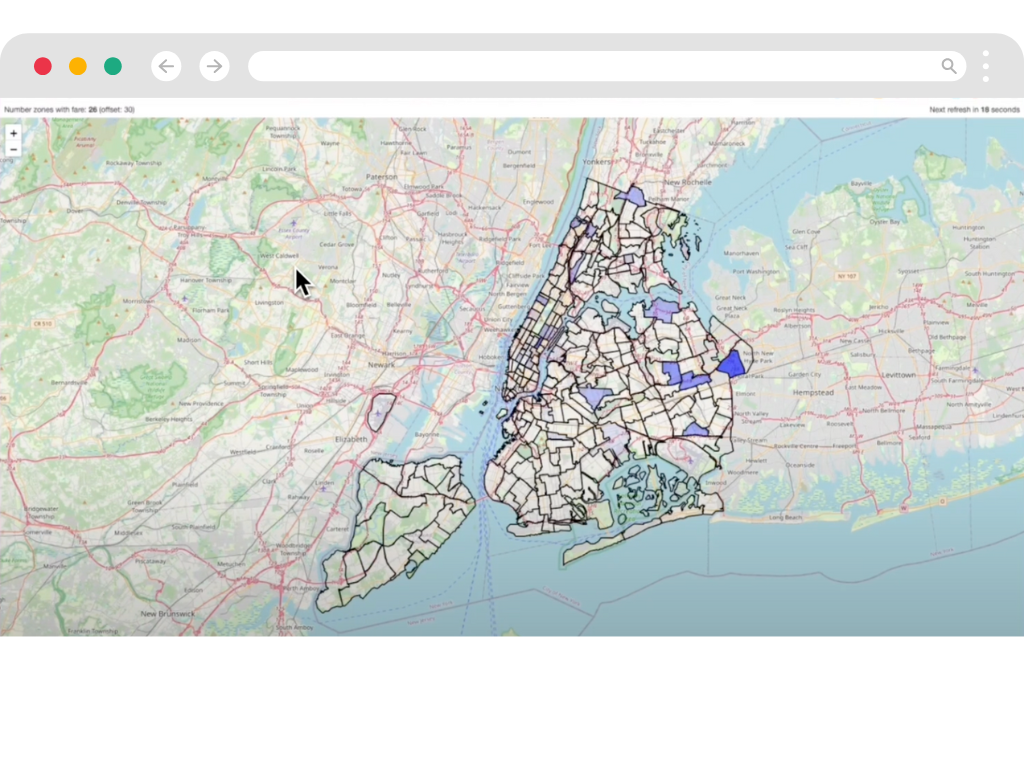
Visualize Streaming Data
Turn streams of events into actionable insights with live dashboards and monitoring.
- Live Insights
- Create live visualizations from your streaming that update automatically. See changes as they happen, not hours later.
- Deep Observability
- Monitor every aspect of your streaming pipeline. Detect and fix issues before they impact your business.
- Custom Views
- Build tailored visualizations for different teams. From operations to business intelligence, all from the same data stream.
Deliver Data Anywhere
Send processed data to any destination with guaranteed delivery.
- Guaranteed Delivery
- Never lose a message with built-in reliability features. Idempotent processing where it matters.
- Flexible Output
- Send data to any system using our CDK. From databases to APIs, deliver data where it creates value.
- Unified Pipeline
- Manage your entire data flow in one place. No more juggling multiple tools and systems.
Scale With Confidence
Grow from prototype to production without needing to glue together multiple disjointed tools.
- Cloud-Native Design
- Managed InfinyOn Cloud service to deploy with one click. Scale as your needs grow.
- Cost Efficiency
- Use 50x less memory than traditional solutions. Lower your cloud bill while processing more data.
- Production Ready
- Built-in monitoring, security, and support. Run mission-critical workloads with confidence.
A new EVENT DRIVEN architecture is here
-

Edge Native
Process data where it's created. Reduce latency and bandwidth costs with smart edge processing.
-

Cloud Native
Scale seamlessly in any cloud. Deploy and manage with modern DevOps practices.
-

AI Native
Handle AI pipelines with event streams naturally. Build systems that respond to events in real-time.
Your modern data stack is BROKEN

You need a SYSTEM not a stack
Technology Leaders Experience
By adopting InfinyOn Cloud, we've transformed our engineering velocity and eliminated the roadblocks and delays associated with traditional systems and services, empowering our teams to focus on innovation and growth.

Develop. Deploy. Dominate.

Lightweight
Compact 37 Mb binary enables efficient data streaming on edge devices with minimal resources.

Edge to core
Ensure data integrity with our robust edge native stream processing, even in unreliable network conditions.
Run Anywhere
Deploy stream processing workers across distributed networks for flexible data handling.

Composable
Build end-to-end data streaming pipelines with a single, unified framework.
What data practitioners say
-

Artem
Data Platform Architect
"I would love a unified solution without the memory limitations of JVM based tools."
-

Joao
Cloud Infrastructure Architect
"It was awesome to see the CLI experience. That's like a million times better than Kafka. I think it's uncomfortable how much better it is than the Kafka."
-

Jowanza
Data Practitioner, CEO, Author
"The event based approach without babysitting a bunch of point solutions is the way I want to build."
Launch in minutes. Scale to infinity.
Frequently Asked Questions
-
Stream processing allows for real-time data analysis and decision-making. It enables businesses to process and act on data as it’s generated, leading to faster insights, improved operational efficiency, and better user experiences in applications ranging from fraud detection to personalized recommendations.
-
InfinyOn exists to simplify event streaming. We firmly believe that event driven architecture and stream processing is the right approach for a connected intelligent digital ecosystem.
-
InfinyOn is a lightweight composable streaming system, diverging from existing solutions that cobble together multiple tools and libraries. At the core of InfinyOn is Fluvio distributed streaming engine built from the ground up to be lean, secure, and efficient. InfinyOn includes a complete suite of CLI tools, APIs, and SDKs, to give developers the control and the flexibility to create modular, end-to-end data flows. Majority of the streaming ecosystem is filled with tools which focus on optimizing existing components—such as enhancing storage speed, file formats, metadata usage, and infrastructure management. Fluvio takes a fundamentally different approach to build foundational tech. Built from scratch using Rust, it leverages cutting-edge advances in hardware, kernel, and compiler design to ensure superior performance, memory safety, and resource efficiency. InfinyOn uses WebAssembly for data processing packages to implement nimble, secure, and flexible components. This cohesive design offers developers a unified paradigm for building streaming applications, eliminating the complexity and integration challenges associated with piecing together disparate tools and libraries.
-
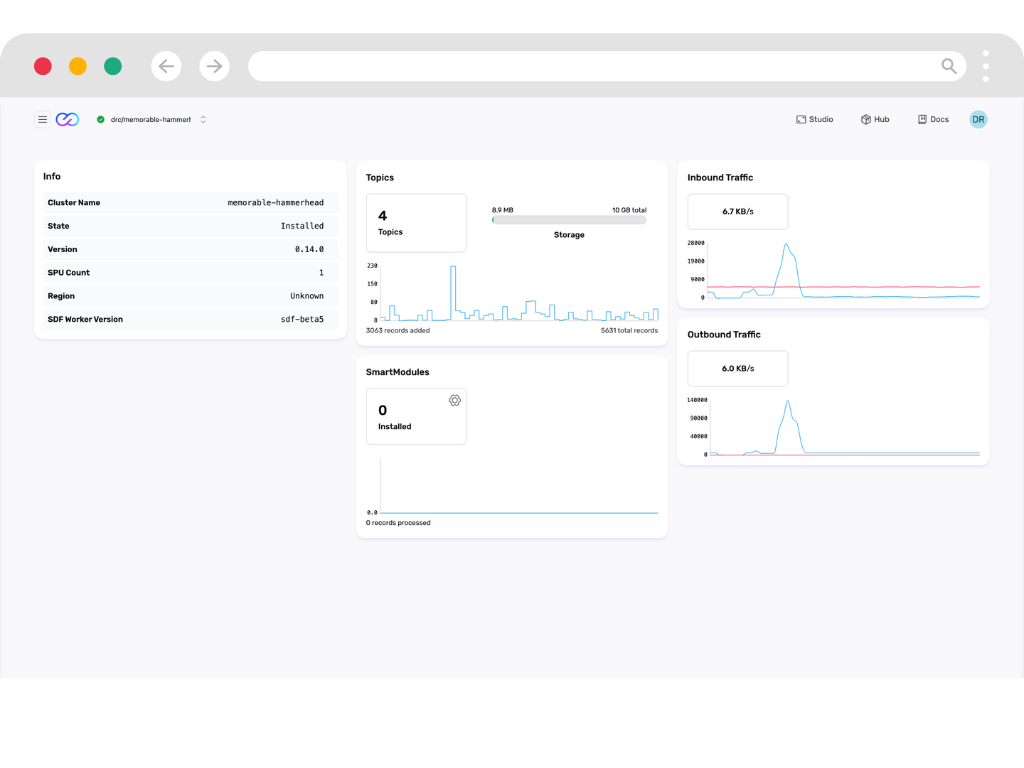
The components of InfinyOn are: Fluvio: Open Source Distributed streaming engine or runtime. Over 200k lines of code packaged in a single 37 MB binary. Download with a script, manage using fluvio version manager, deploy on ARM64 edge devices. Cloud native deployment using Kubernetes on InfinyOn Cloud. Fluvio CLI: Fluvio command line interface or CLI is for users to setup and run Fluvio streaming engine on their terminal. Fluvio Clients: Rust Client, Python Client, Node Client and additional community clients. Connector Development Kit(CDK): Fluvio connector development kit is for developers to build connectors to data sources like mqtt, http, s3 etc. as well as data sinks like s3, databases, consumer applications. Smart Module Development Kit(SMDK): Fluvio smart module development kit is for developers to build smart modules or packages to run unbounded transformations on connectors to collect and distribute data with deduplication, filters, flattening etc. Smart modules are like lambdas to transform streaming data. Stateful Data Flow(SDF): Stateful data flow is a developer toolkit to build, deploy and maintain end to end stateful streaming data flows on Fluvio. Stateful data flow provides developers with a ruby on rails type experience to express schema, types, state objects, and business logic operators to express chain of stateful and stateless transformation on streaming data.
-
There are 3 ways of integrating data sources and sinks with Fluvio. 1. Fluvio Client: Developers use the Fluvio Client to directly integrate Fluvio into live applications. Fluvio client is the most flexible connection to connect with practically any data source or sink. 2. Fluvio Connectors: Fluvio offers pre built connectors which are opinionated fluvio client packages built using Fluvio Connector Development Kit to interact with specific systems like databases, storage layers, messaging protocols, applications. 3. Custom Connectors: Developers can build connectors to any proprietary custom data system using the connector development kit or reach out to us for a custom connector build. We build connectors on demand at extreme speeds. There are some examples in this git repo - https://github.com/fluvio-connectors
-
At InfinyOn our goal is to sustainably maintain our open source projects while building a enterprise data platform. InfinyOn is a combination of Fluvio open source and proprietary Stateful DataFlow. We are deliberate about enabling developers to use the open source without worrying about license issues. At the same time we are intentional about making it easy for businesses to make reasonable decisions to adopt commercial licenses whether they want a managed infrastructure platform as a service, or deploy in their own cloud infrastructure. We make it easy for smaller teams to start small without any strings attached.
-
Yes. InfinyOn Cloud is a fully managed infrastructure as a service offering of Fluvio and Stateful DataFlow.
-
There are 3 main differences between the open source system and InfinyOn Cloud managed service. 1. Cluster Tenancy and Management: As expected InfinyOn Cloud offers additional functionality including multiple users, multiple deployment regions, admin interfaces, secret management, webhook gateway etc. 2. Support, SLAs, P99: Manged InfinyOn Cloud deployments obvious ly get higher priorities on support and performance SLAs. Self hosted installs have optional support add-ons for smaller teams to continue using open source with confidence. 3. Stateful DataFlow Interfaces: InfinyOn Cloud implementation of Stateful DataFlow offers additional UI interfaces and worker management interfaces beyond what the free to use self hosted version provides.
-
The technology is certainly capable of supporting custom deployment models. We have built InfinyOn Cloud with a secure by design approach. There is a clear separation of control plane and data plane and complete security and privacy for your data on fully managed InfinyOn Cloud. You can deploy in the region of your choice. Air gapped installs and BYOC installs are only entertained in enterprise contracts.